Saturday 30 June 2012

Blot on the landscape

I have some very mixed feelings over the last couple of days. I came home from work on Thursday to discover the house had been broken into :-(. They had only taken small things that could be concealed very easily. But this meant they had taken my mums jewelry.  They had also taken my spare set of car keys so I spent all day Friday trying to sort the car out. There is a silver lining however, Friday was the year 11 prom and I got to see all the students dressed in their finery


 This is Elizabeth and  unfortunatly I wasn't very 'on the ball' and hers was the only photo I manged to get :-$

And this is me and sherridan bless


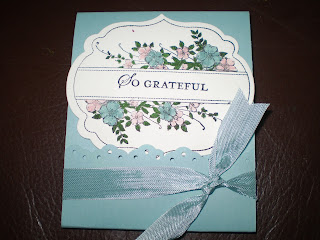
I also have had a little time today to make a lovely card using so saffron and crumb cake I did get this idea from another demonstrator. Sorry about the photos but had to take them on my phone as my camera was one of the items stolen.


Happy crafting
 Deb xxx


Tuesday 26 June 2012

Button Bracelet

Well today has been a very exciting day as the Olympic torch found it's way to Doncaster, even better a friend mine was carrying the torch!!  The lovely Julie Arnold carried the torch on a stretch through Warmsworth. Sadly I couldn't be there to cheer her on but in a queer twist of fate I did get caught up in the traffic jam she caused lol I was really spurring her on as I really needed the loo. Julie did pop into work afterwards and let me hold the torch lol.

So to what I've been making, as you can see from the title I've been playing with buttons, and have made a lovely button bracelet using the basic colours;
I've popped some Bling! into the middle of the Small buttons, here's what it looks like on;

It is so very easy to make and only takes only about 20 mins. There is a tutorial for it here

That's all for now

Happy Crafting

Deb xx

Friday 22 June 2012

It's begining to look a lot like Christmas

Well it is in our house at the moment anyway :-) I've been getting together my swaps for our quarterly training and I've got them finished with a week to go would you believe!!  Yes I know Miss Disorganised here is pulling it together with time to spare! Mark this date in your diary it'll never happen again lol.  So here are my swaps, I mentioned I was doing these in an earlier blog;

My kitchen smelt Divine after heating all these tea lights as they are vanilla scented, I have also made a little gift bag to carry them all in ;


I used the broadsheet alphabet for the candles, and the Pennant Parade for the bag along with the Petite Pennants Builder punch. I've used Garden Green card and ink, Crumb Cake ink, and  Riding Hood Red card and Ink and also the Decorative Label punch.  I have also added either Cherry Cobbler or Always Artichoke seam binding ribbon on the candle packs.

Happy Crafting

Deb xx

Wednesday 20 June 2012

Dragonfly Candles

Yes you've guessed it I've been busy stamping candles again, no idea why I choose to do something that involves heat when its so hot. So here they are, I've stamped using the natures nest stamp set and Marina Mist and Crumb Cake ink pads;

 If you're wondering how it's done you just stamp onto tissue paper, then place on your candle and heat, if you're not that brave place the stamped tissue paper on your candle then wrap tightly in greaseproof paper then heat, you can see the image 'turn' under the greaseproof paper so you will know when its done.

Happy Crafting

Deb xxx

Tuesday 19 June 2012

Tealight Stampin

ohhhh bit of a strange day yesterday, I've been off work (LSA job) because I've been suffering with vertigo so yesterday, feeling a bit better I thought I'd try a little walk, big mistake lol people probably thought I was drunk!  Back to sitting today and not wandering about too much.

So what have I been doing?  Stamping Tea lights, I'm sure you've seen in a previous blog where I have stamped church candles so I thought I'd have a go with tea lights, it is far easier than stamping on candles and here's how I got on;
Aren't they lovely, I also made a gift box to go with them;
The box, by the way fits three of the tea lights inside.  I wanted something though that would take a little less time in the making than a box as I'm planning to use these as swaps if I manage to get to our next training, the theme of which is Christmas, so here's what I came up with;

Unfortunately the little stamps and the little reindeer stamp aren't available in England :-( They make up a set that you can use to make an advent calendar with.  I got mine sent to me as a Christmas present from a friend in America.
As you can see I just inked the image and not the number so that I could use them on the candles.

Well happy crafting everyone

Deb xx


Sunday 17 June 2012

Coaster Gift Packs

If you read Stampin Corners facebook page yesterday you will have got a sneak peek at what I was doing yesterday, not much of a clue by the photo though lol.  I was hoping to blog about this yesterday but I was rushing around sorting out some last minute fathers days gifts, one of the things I did was pick up some cakes from The Cherry Blossom Bakery that I'd had made for my Dad, in Muppet characters.

I'm getting off track as usual so here are the things I made, first the coasters I got this idea from the lovely Monica;
These are so quick and easy to make and a great gift idea, it's just a matter of winding some fabric around some cord then spiralling the cord round, I used the candy cane fabric for these.

When I first started to do these I didn't have in mind doing them as a gift set, but I thought how wonderful if I packaged up some tea and coffee to go with them, so here's the coffee;

I've made this with Baja Breeze and Pretty in Pink card and used the Tea Shoppe stamp set, and it fits two sachets of coffee;

And here's the tea gift pack ;
Again this fits two twinnings tea bags inside;
I've used the Attic Boutique papers for the pockets in this one, I adore these papers they are just so beautiful.

I then decided to gift pack two coasters and the tea set in one package and the coffee in another;
I've added the "made just for you" stamp from the creatively Yours stamp set.  The pink ribbon is from some of my own craft stash.  I really like these sets so simple and yet a lovely gift.

Well that's all for now
Happy crafting
Deb xxxx

Friday 15 June 2012

Scraping and Gifting

Well I'm writing this on yet another raining day in deepest darkest Yorkshire, I also think I just heard thunder.  Thunder always reminds me of my Granny Gelder, she knew I was terribly frightened of it so would sing to me whenever there was a storm, while we we staying with her.  " I hear Thunder, I hear thunder. Hark! don't you?" I'm sure you must know it from your own childhoods :-) well that brings me neatly to my first make of the day which is a scrapbook page;
We were given this page as a make and take at our recent Leeds training.  The picture is of my Grandma and granddad and my dad aged 3.  I believe he was once so cute!! lol

Talking of dad I finished off the gift bag I was making to pop all his pressies inside for fathers day. Here it is;
I've used the Open Sea stamp set to match the card I made him which is in an earlier blog, and I've again used the framelit dies

 and also the Two Tags die to make the gift tag,

I've attached the tag to the gift bag using the new coloured bakers twine, I love it!! and I did all this wearing false nails!  I usually paint my own nails and add my own nail art but since I've been having problems with my shoulder its been very hard to do, so I decided to pamper myself and this is the result.

Aren't the little 3D flowers lovely?  I was really very pleased with them and feel that this may be the way to go for me now.

Well that's all from me, better go and tidy up my mess ;-)

Happy Crafting

Deb  xxx

Wednesday 13 June 2012

Chocolate Bar Covers

Well I hope this post finds you all safe and well after the floods that have hit some parts of the country.  Today here in Yorkshire looks like a bit of a let up rain wise, although still no sun yet :-(

Well down to today's crafty bits, I was wondering what I could get my Dad for fathers day seeing as he seems to have everything he needs and this is what I came up with.  CHOCOLATE!! Can't possibly fail with that, but how do I make a bar of chocolate something that bit special?  Here is how I did it;
Ok so this is supposed to be Doogle from The Magic Roundabout, he reminds me of my Dad so I thought this was a good place to start.  Now to make him you need to have the kind of chocolate that still has the old type of paper wrapper around it, not easy to find now but as luck would have it The Cherry Blossom Bakery still wraps their chocolate in this way and even better, their chocolate is to die for!  All made by the lovely Charlotte.  If you haven't tried their Choc bars, cakes, cupcakes or chocolates then you need too as they are very scrummy!

As you can see Doogle is made using crumb cake card, for his hair I just cut a half inch strip and wound it around a pen.  I've used used the Oval, 3/8, 1 1/4, 1 3/4 circle punches, using basic black for his eyes, nose and mouth and real red for his tongue.

But I didn't stop there, oh no I was on a roll, at least thats what I thought lol.  So I also did this;
This is Animal, one of my Dad's favourite Muppet's, for him I used Pumpkin Pie, Melon Mambo, Whisper White, Real Red and basic black card, I used the Modern window punch (teeth and eyebrows), small oval, 3/8, 1 1/4, 1 3/4 circle punches and drew around a cup and a coaster to make his mouth.  I hope he likes them.

Happy Crafting

Deb xxx

Sunday 10 June 2012

Envelopes for Square Cards

As promised a blog with envelope sizes for using with the new diagonal score board.  I will follow this up with another blog of envelopes with a half inch depth in case you have some cards with a lot of dimension to them.

As a rule I make all of my envelopes just for the reason of being able to personalise them, it just adds that little extra special touch to a beautifully handcrafted card.

So we'll start with a 5" x 5" square card
Cut your paper to 7 1/2" x 7 1/2" Square,  Then score all four corners at 3 5/8, then simply fold in the corners, it should look like this

 and tape your envelope together. You can make this envelope from A4 card or paper, all the other sizes that now follow need to be made from either 12" x 12" paper or A3 paper.

6" x 6"  Envelopes
Cut your paper to 9 3/8" x 9 3/8", then score all four corners at 4 3/8"

7" x 7" Envelopes
Cut your paper to 10 3/4" x 10 3/4", then score all four corners at 5 1/8"

8" x 8" Envelopes
Cut your paper to 11 5/8" x 11 5/8", then score all four corners at 5 5/8"

A5 Envelope (Just in case you missed it on my other post)
Cut your paper  to 11" x 11", Score opposite corners at 6 1/4", then score the other two opposite corners at 4 1/2"

And lastly here's a small 3" x 3" envelope this is great for small thank you cards or for tooth fairy money ;-) as you can imagine they are most popular in our house with Scotty too Hotty
Cut your paper to 5 1/8" x 5 1/8", then score all four corners at 2 3/8", this envelope can be made using A4 card or paper

Well I hope you've found that useful, if you have a particular size card that you want an envelope for then send me the measurement for your card in inches and I'll do my best to size the envelope for you :-)  If you'd like to order the Simply Scored scouring board and or diagonal plate please email me debbie72keating@yahoo.co.uk

Happy crafting

Deb xxx

Saturday 9 June 2012

Up on the Open Sea making envelopes

ooohhh the waters can get rather choppy sometimes in our little household, three people all of whom are very vocal and opinionated you can just imagine can't you? lol

The waters today however are rather calm as we have all been making pizzas together, in between me making cards and trying to figure out different envelopes on the simply scored diagonal plate, this way everyone gets a pizza they like, Scott with a little tomato loads of ham and chorizo, Ray loaded with extra everything and triple cheese and me, well just to be different as ever I'm having fish and potatoes ;-)

Now to today's card, it's a Fathers Day card I've made for my dad who will hopefully be here for dinner next week, don't worry he won't see it before the day, he never reads my blog.

I've used Baja Breeze, yes I know again! lol the top note die, the open sea stamp set and the sentiment is from the Delightful dozen stamp set.

He likes tall ships which is why I've chosen this stamp set in particular, we will also be having some muppet themed cupcakes on the day too.  Hope he enjoys the fuss.

Now envelopes, I'm slowly figuring out envelope sizes using the new diagonal board and as soon as I have a new set of measurements I'll post them on here, I'll always mention envelopes in the title when I do this so that you will know what to look for.

This first set of measurements are for a standard A5 envelope.  You need to start with an 11" x 11" square of paper.  Score using the diagonal score board on opposite corners at 4 1/2" then score the other two corners at 61/4".  When you fold all this together it will make your A5 envelope.

Happy Scoring

Deb xxx

Friday 8 June 2012

Lost and rejigged

Again I here you cry, another blog post! Well yes I thought I'd treat you as I'm off work due to half term and the weather is doing it's worst and scuppering mine and Scotty too Hotty's plans.

Another day of rain I'm afraid, what to do with an eight year old on days like this?  Well we made a shepherds pie, and now as we speak Scotty too Hotty is holding his own pretend cooking class with his teddy friends and guess what they are making? ;-)

As you know I've been sewing like mad this last couple of days, I finished off with a pencil case to match my bag here it is;

As you can see I've added the fantablous Jelly Bean Brads to this. love it! Two buttons to fasten it up as I've not mastered zips as yet.  I also wanted to add a tissue holder to this set, I did try to make one out of fabric but I didn't like the finished result, so as I had purchased a template to make a paper one I went looking for that, but alas could not find that any where, I'm assuming it's hiding with all the lost socks, Scott's remote control and a travel brush of mine which have also all disappeared.  A bad case of the borrowers maybe ;-). 

I was not worried as I am a proud owner of the NEW simply scored scoring board so decided to take a few measurements from my tissue pack and make my own, and here's the finished result;


Aww every ones favourite bear Tatty Ted is hiding inside. Although the paper is double sided I wanted it to match every thing else I'd made so fixed two sheets of the DSP Twitterpated paper together to make this, it has the added benefit of making the box itself stronger too.  I've added a flower that I made with the Blossom Punch which the flap of the tissue box tucks behind.  I'm very happy with it all and love my new matching set :-)

See you soon

Deb xxx

Thursday 7 June 2012

The Madness goes on


So after dragging Scotty too hotty round the supermarket for baking items, whilst keeping an eye out for him sneaking in little trinkets he might fancy along the way, we finally made it home without too much fuss, apart from a man standing right next to me as I was leaning into the car and shouting JESUS!  I thought he was on about the size of my bum! How rude I thought (even though it is on the rotund side lol) luckily he was exclaiming at a young lad on a bike who had nearly mowed him down *giggles* Now I'm sorry all you papercrafters but I've been at the sewing machine again. Look on the bright side I'm not the best sewer and I've had to refer to my sewing machines manual several times, but these two projects did not take long, and if I can do it then anyone can!  So here's my first project;


It's a lovely little clutch bag, I even manchine to use my machine to make a button hole AND sew on a button! I have problem with my shoulder so I thought this with it's little wrist strap would be ideal for when I'm at school in my other guise as a Learning Support Assistant. Both my pencil case, notebook and diary fit in it perfectly;


I also made this little wallet to go with it, it fits my business cards in and some money should I need it;


Aren't they lovely?  I'm really chuffed with myself , whats even better is that these patterns are free and available here

Now I'm off to feed Sir Scott

See you soon
Deb xxx

Wednesday 6 June 2012

Sewing Machine Madness

Well what a funny day I've had, I meant yesterday to dig out the sewing machine from the deep darkness of what is know as 'under the stairs' and do some sewing using some of the Stampin Up fabric, but that did not work out as Scotty too Hotty was poorly, so I was busy playing nurse and giving cuddles :-).

So today out comes the sewing machine, now I've owned this machine for 30 years and it was second had when I got it, I've not used it for 20 years and couldn't remember why.  I set the whole thing up and was raring to go and .......... it didn't work, which is probably why I packed it away in the first place, whats more is I've moved 6 times since I packed it away and instead of getting rid of the thing dragged it along for the ride *rollseyes*

Not to worry I went out and purchased myself a reasonably priced SIMPLE machine as my sewing is at novice level so I didn't want some complicated thing and I made these;
I made these lovely slippers from the twitterpated fabric available from the new Spring mini.  If you would like the pattern for these it can be purchased from here .

Can you see the ribbon holder behind them?  Here it is;

Scotty's Granddad made it for me, now if you are getting a little ribbon storage jealously he is willing to make more for a cost of £20 plus postage and packing.  Let me know if you would like one and I'll pass on your details :-)

Bye for now
Deb xx

Monday 4 June 2012

Stampin Up Do it again

Stampin up have again come up with some fantastic promotions for June and July!  I really don't know how they keep doing it!

Here's the first
From the 1st June until 31 July 2012 Hostesses can get £80 of free products with a qualifying party!  That's an extra £30 of FREE products when you host a party!  Click here above for more information.

But that's not all oh no.

 To help you reach your required sales from the 1 - 30 June if you buy three sets of designer papers you'll get a set Free!  Free!  Click here to see the papers available in this offer.  Please email me if you would like to host a party or if you would like to order some papers

Well now I'm off the pick some papers ;-)

Deb xxx

Sunday 3 June 2012

Jubliee Delights

Well as I said in my last blog I was having a day full of making bunting, and baking and here are the results, after popping up the bunting around the house outside I decided the inside could do with a little jubilee decorating too and here's the results.


I Decorated the kitchen using the pennants punch and Not quite Navy, real red and Confetti White card and then there was the baking, now I must warn you although my cakes taste lovely I have not quite mastered piping or getting the consistency of the butter cream quite right (it didn't occur to me that the food colouring would make it more watery DOH!)

They do taste very moreish though lol and finally my crown biscuits, again the piping needs work lol
Well that's it my friends, I'm off now to cook Sunday Dinner as my dad is blessing us with his presence this jubilee Sunday, I hope you all enjoy whatever you maybe doing this weekend to celebrate 60 years of our Queens rein.

Deb xxx

Saturday 2 June 2012

Richard the lionheart, a goodbye and a thank you

What a busy week I've had.  Everyone has been gearing up ready for the Queens Diamond Jubilee and the kids at school have been off the wall with excitement because it was the last week before their holidays.  Talk about hard work lol.

I'd like to start with my little King Scotty, we had a letter from his school requesting that the children go dressed as Kings, Queens, Princes or Princesses.  Scott decided he'd like to go dressed as Richard the Lion heart (because he was brave apparently ) and here he is in his costume.
I think he looks wonderfully Kingly, don't you?  Do you recognise the paper used to make his crown?  Made by Scott himself by the way.  Stampin up had to get into his costume somehow lol.

Friday at school was a day full of mixed emotions as it was the day our year 11's were leaving, some of them have decided to come back to 6th form but a fair number are off to college or are going onto apprenticeships.  One of the pupils I work with brought me a card and had made me a strawberry flavoured cupcake, I was so touched, it's not very often us Teaching Assistants get thanked in secondary school.  I couldn't let that go with out a thank you so I made the pupil in question a thank you card and a little post it note holder for college, here they are:


I've found a sudden love of Baja Breeze since the training in Leeds I really like the colour and love that matching seam binding it makes such lovely bows!  As you can see I've used the Apothecary Art stamp set and the framelits, I adore this set it's just so beautiful.  I've coloured the images using the Stampin write pens.  I'm going to use this same set to make a thank you card for our neighbour who is kind enough to take in my ups parcels when I'm at work, such a lovely lady.

Well that's all for now, I'm off to cook Jubilee cookies and cupcakes, I'll post about them here if they turn out lol

Deb xx