Sunday, 27 May 2012

Saturday Craft Club

Wow! what about the weather this week?  Just a shame we're all at work *grumpy face* but at least it's lasted for the weekend yay!  BBQ in this little household today me thinks.

Anyhoo to craft club and our makes, all these makes were ideas that I obtained from the Stampin Up training at Leeds, so much inspiration and so many talented people in one space, lovely. So heres what we made;

The baskets are made from the Attic Boutique papers with Baja Breeze seam binding, I've filled these two with bath time goodies but I think they would be lovely if they were filled with chocolates from The Cherry Blossom Bakery   These baskets are so easy and quick to make and an ideal gift for someone.


This is a wonderful little gift, I've made it using the new framlets and the tea shope stamp set, inside there are two individual fruit tea bags

I've used the designer papers to make the pockets for the tea bags. 
I've stamped a design on the back too, using the same stamp set.  A lovely gift for someone who has been poorly or just a little gift for a friend.

This idea came from the Impressions publication that all demonstrators received, it's full of ideas and advice, this one holds post it notes but it could also hold a small note book.

This is ideal gift for your children's teachers at the end of the school year, I know I'll be busy making a few of these for Scotty this year :-)

Talking about demonstrator, ever thought about being one?  The Starter kit has now dropped in price to just £99! and if you sign up now you will be given FREE tickets to the Stampin Up conference in Germany on the 2nd and 3rd of November! Why not contact me and we can have a chat about all the benefits of becoming a demonstrator. 

That's all for now

Deb xx

Tuesday, 1 May 2012

The Summer Mini is Here!!!!!!!

Yes it's here and let me tell you I've been bursting to show you things from it!  It's packed full with must have goodies, and we also have some new tools for you to try, like the fantastic framelits and the new scoring board that holds 12 x 12 paper!


And look what I made with it;


These are invitations to my 40th Birthday.  Yes my friends I know it's hard to believe I don't look a day over 25, but alas come November I will have reached middle age ;-).  I used the simply scored scoring tool to make the rosette, it's made from the new Attic Boutique Designer Papers,

I've used the textured impressions embossing folders to emboss the hearts over the word invited and I also used them to emboss the white background and used the same shaped Edgelit Die to cut it out.
Talking of Dies I used the new Framelits dies for this next card;
Can you spot that new ruffled ribbon too?
It's fab!!!! This card also features one of the new stamp sets, Love and Laughter.
As you can see the dress is made up of different wedding words.

It doesn't stop here oh no look at this!


Again it features the Attic Boutique Papers, I love these papers can you tell ? I've also used The Open Sea stamp set,


but there is something a little special about these stamped images, that you can't see but you can smell once you get close to the card, yes you read that right SMELL. Its the ALL NEW SCENTED STAMPIN EMBOSS POWDER.  You can pick between Vanilla, Melon and Cherry my card smells of cherries.


There is just so much in this catalogue you'll be spoilt for choice!, why not click on the link on my page and take a look at all the wonderful crafty stuff you can buy and email me with your order.


Bye for now

Deb xx

Sunday, 29 April 2012

Cupcake Box Tutorial


Take a piece of 12 x 12 paper and score it at 4 inches and 8 Inches.

Turn the paper around and do this again
Then score a diagonal line from the corner to the first score line
Do this on all four corners.  Then cut off the excess corners like so ;
Do this to all four corners, your paper should finish up looking like this;
Score at 1/2 an inch all the way round on your straight edges NOT the diagonals
Cut away the 1/2 inch strips from all four corners

It should look like this when you are finished, sorry about the blurred photo :-)

Now you can glue down the tabs, glue them down to the side of the paper that is going to be the 'inside' of your box
Then fold the box together
To make the cup cake holder for the inside of your box you need to cut a piece of card 4 and 7/8's of an inch by 4 and 7/8's.  Score 1/2 an inch on all four sides, again cut off the corners.
Punch out a 1 and 3/4 circle place this in the middle of your card and cut around it
 Once you've cut out your circle fold in your edges.
Place this inside your box
To make the lid you need a 6 x 6 piece of card, score 1 inch all the way around
Cut down to the first score line on opposite sides to make your glue tabs
Glue these tabs down to finish your lid.  Pop this on top of your box

As you can see I've popped a flower, with a gem on top of my box for decoration

Items used in this project
Papers Pocket full of posies
Card Pool Party, Daffodil Delight, Old Olive
Dies Blossom Party, Leaves #2
Punches 1and 3/4 circle
Extras Rhinestone, Stampin Dimensionals

Saturday, 14 April 2012

Triple the fun

Well as the Easter holidays draw to a close I find myself contemplating going back to work and having to deal with teenagers again *groans* ah well onwards and upwards, could be worse I suppose ;-).


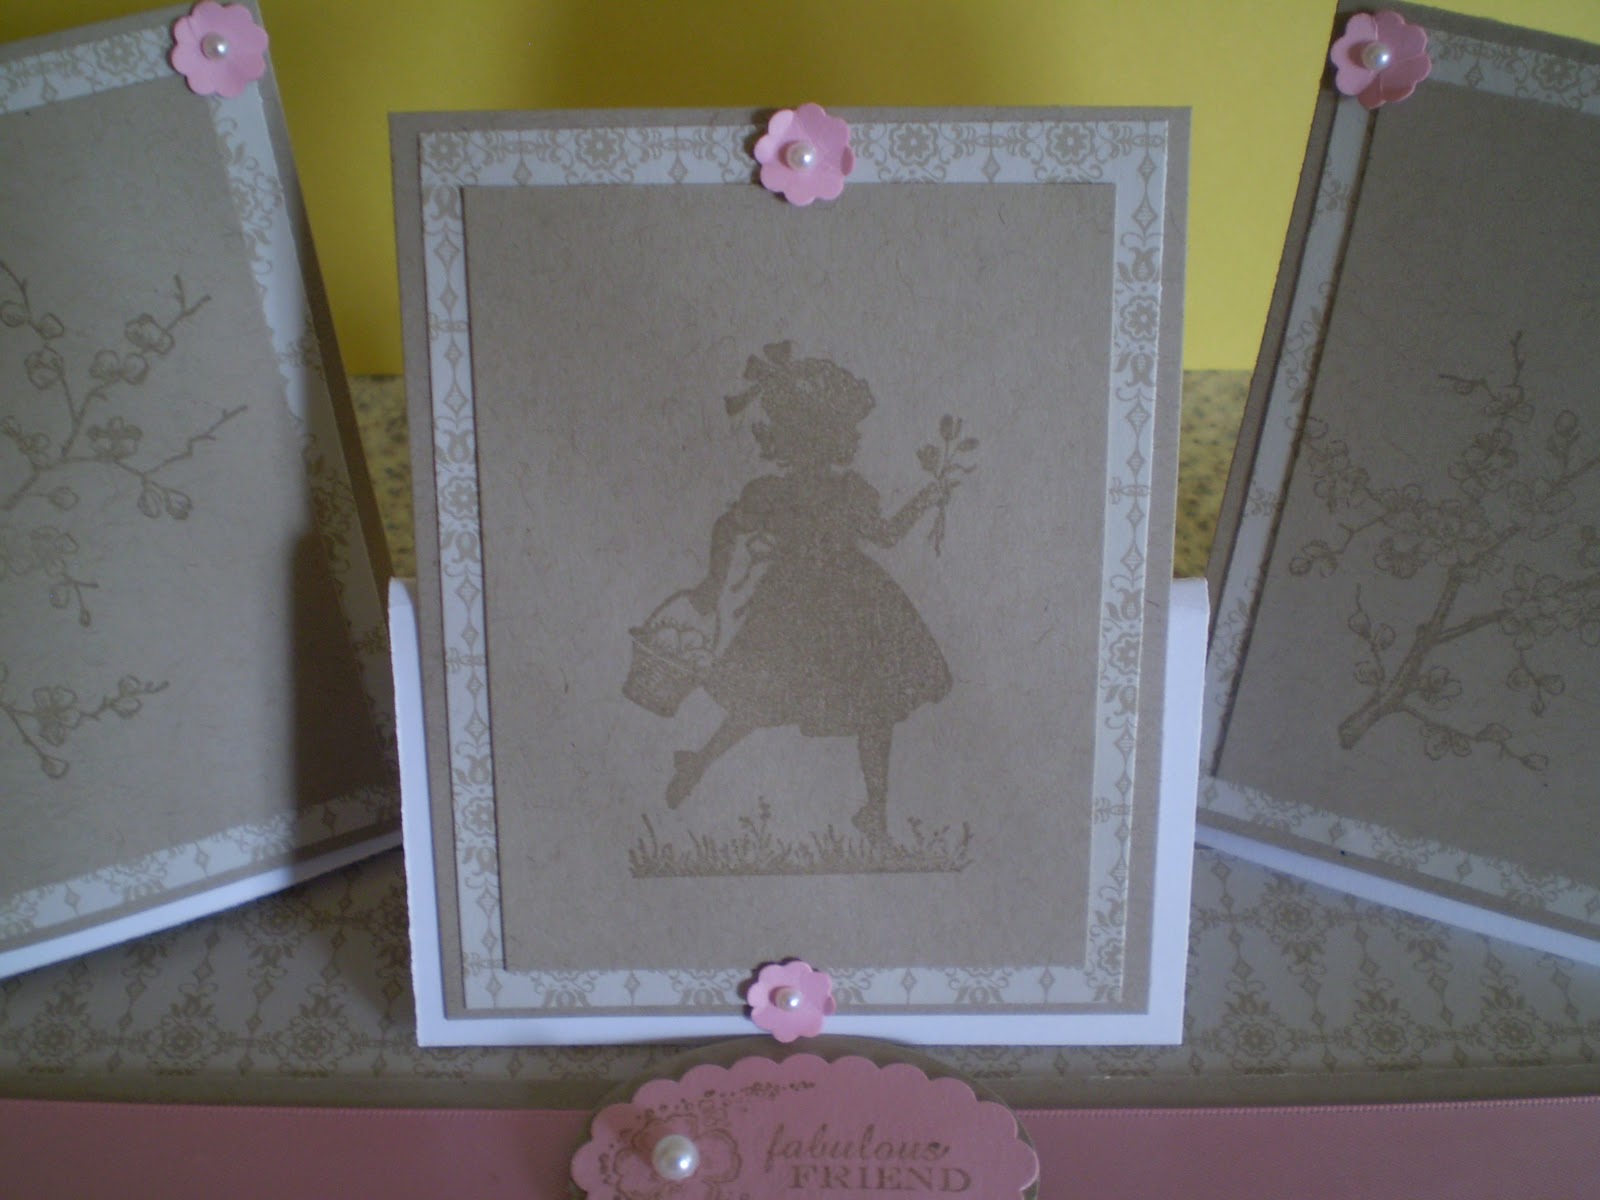
So I've made the following triple easel card.
It's made from a single piece of A4 card and I've used two simple colours. Crumb Cake and Pretty in Pink.  The Stamped Images are from the Spring Mini Catalogue and is the Easter Blossoms set. Take a closer look;

I've used the lovely designer papers in basic and used the Itty Bitty Shapes punch for the small pink flower, to the middle I've added a small pearl.


I've stamped the sentiment in crumb cake onto pretty in pink card stock I then punched it out using the scalloped oval punch and popped it on to a extra large oval punched from crumb cake.

The card is a little 'twist' on this weeks Simply Stampin challenge sketch, below.


Hope you like it

Deb xx
Thursday, 12 April 2012

Christmas Scrapbooking

Finally I've started AND finished my Christmas scrapbook page

As you can see it's a double page spread, complete with Golden sledge and reindeer.  Here's a closer look at the first page;
I've used a 12 x 12 sheet of Real Red Card, for the sledge I used some glittered paper that I already had as part of my crafty collection ;-) I used soft suede for the reindeer.  I stamped out the word Christmas using the Broadsheet Alphabet stamp set, in Old Olive ink, I then punch out the letters using the large oval punch.  I backed the pictures on to green designer paper from the Paisley Petals range.  The two stars of this page in case you were wondering, are Scotty too Hotty and  Ray.

Again I stamped out the word Time using the Broadsheet Alphabet and Old Olive ink,  I used a green strip of designer paper again from the Paisley Petals range, this is the same paper I used the back the picture, on the top of this I used some Christmas designer papers, I was given these papers so I'm not sure which they are but I'm quite sure they have unfortunately been discontinued.  I used bakers twine as reins on the reindeer and popped a soft image from the Welcome Christmas stamp set in the corner.  The main stars of this piece are, me, Dad, my brother Ryan and Scotty too Hotty.  Oh and by the way only 257 days till Christmas ;-)

Deb xx

Tuesday, 10 April 2012

Easter

My what a busy weekend, we went down to the West Midlands to visit my Grandmother and my Great Uncle Bill.  A great adventure for Scotty too hotty who doesn't get to see his Great Grandmother that often :-)
Now to an Easter Card
I used the Easter Blossoms stamp set from the Spring mini Catalogue, Pool Party and Pretty in Pink Card and ink pads, buttons are from the Subtle range and there is also a little sneaky peek at something from the new Summer Mini catalogue out in May, can you guess what it is? shhhhhhhh ;-)

I'm entering this into the Simply Stampin Challenge

Deb xx

Thursday, 5 April 2012

A Lion Comes for Tea

Last Friday Ray brought Scott a lion outfit, and ever since I've been hard pushed to get him out of it.  I have however managed to prise him out of it today so that I could wash it.  So here's the new addition to our family.
Scott assures me he's quite tame and doesn't bite. ;-)

He was therefore the inspiration for the following two cards I made, seeing as I had a little monster in the house.

CUTE!  I used the Dinoroar and the make a monster stamp sets for these two, and the happy birthday is from the For My Family set.

I used So Saffron card and the scaly effect paper is from the Nursery Nest Designer papers, the papers are free if you spend £45 Between 1 - 30 April!  I also used buttons from the brights collection.
The buttons on this card are from the pastels collection and you are also getting a sneaky peek at something from the Summer mini Catalogue which will be launched on the 1st May, can you guess what it is?

Right time to feed the lions ;-)

Deb xx